Description
This circuit is used to relay signals from an Infra Red remote control in one room to an IR controlled appliance in another room.
Forward
I have seen these devices advertised in magazines, they sell for around £40-£50 and use radio to transmit between receiver and transmitter. This version costs under £5 to make and uses a cable connection between receiver and transmitter. For example, if you have a bedroom TV set that is wired to the video or satellite in another room, then you can change channels on the remote satellite receiver using this circuit. The idea is that you take your remote control with you, aim at the IR remote control extender which is in the same room, and this will relay the IR signal and control the remote appliance for you. The circuit is displayed below:
Circuit diagram

Parts
1 SFH2030 Photodiode
1 TIL38 IR emitting diode
1 5mm Red LED
2 4.7M 1/4W resistors
1 1k 1/4W resistor
1 2.2k 1/4W resistor
1 27ohm 1/2W resistor
1 BC337 transistor
1 CA3140 MOSFET opamp
The LPC661 opamp Radio Shack # 900-6332 can be used as a substitute for the CA3140
Circuit Benefits
This circuit has an advantage over other similar designs in that there is nothing to adjust or set-up. Also bellwire or speaker cable can be used to remotely site the IR emitting diode, since this design uses low output impedance and will not pick up noise. Some systems require coaxial cable which is expensive and bulky. The wireless variety of remote control extenders need two power supplies, here one is used and being radio are inevitably EM noise pollution. A visual indication of the unit receiving an Infra Red signal is provided by LED1. This is an ordinary coloured LED, I used orange but any colour will do. You will see LED1 flash at a rate of 4 - 40Hz when a remote control button is pressed. LED0 is an Infra Red Emitter Diode, this is remotely wired in the room with the appliance to be controlled. I used the type SFH487 which has a peak wavelength of 880nm. This is available in the UK from Maplin Electronics, order code CY88V. Most IR remote controls operate at slightly different wavelengths, between the range of 850 - 950nm. If you cannot obtain the SFH487 then any IR emitter diode that has an output in the above range should work.
About IR Remote Controls
As previously stated IR remote controls use wavelengths between 850 - 950nm. At this short wavelength, the light is invisible to the human eye, but a domestic camcorder can actually view this portion of the electromagnetic spectrum. Viewed with a camcorder, an IR LED appears to change brightness. All remote controls use an encoded series of pulses, of which there are thousands of combinations. The light output intensity varies with each remote control, remotes working at 4.5V dc generally will provide a stronger light output than a 3V dc control. Also, as the photodiode in this project has a peak light response at 850nm, it will receive a stronger signal from controls operating closer to this wavelength. The photodiode will actually respond to IR wavelengths from 400nm to 1100nm, so all remote controls should be compatible.
Circuit Description
The receiver is built around a silicon photodiode, the SFH2030 available from Maplin, order code CY90X. This photodiode is very sensitive and will respond to a wide spectral range of IR frequencies. There is a small amount of infra red in direct sunlight, so make sure that the diode does not pick up direct sunlight. If this happens, LED1 will be constantly lit. There is a version of the SFH2030 that has a daylight filter built in, the SFH2030F order code CY91Y. A TIL100 will also give good results here. A photodiode produces minute pulses of current when exposed to infra red radiation. This current (around 1uA with the SFH2030 and a typical IR control used at a distance of 1 meter) is amplified by the CA3140 opamp. This is configured as a differential amplifier and will produce an output of about 1 volt per uA of input current. The photodiode, can be placed up to a meter or so away from the circuit. Screened cable is not necessary, as common mode signals (noise) will be rejected. It is essential to use a MOSFET input type here as there is zero output offset and negligible input offset current. A 741 or LF351 can not be used in this circuit. The output from the opamp is amplified by the BC337 operating in common emitter mode. As a MOSFET opamp IC is used, its quiescent voltage output is zero and this transistor and both LED's will not be lit. The 1k resistor makes sure that the BC337 will fully saturate and at the same time limits base current to a safe level. Operating an IR remote control and pointing at the photodiode (SFH2030) will cause both LED's to illuminate, you will only see the visable coloured LED (LED1) which will flicker. Remote controls use a system of pulse code modulation, so it is essential that the signal is not distorted by any significant amount. Direct coupling, and a high speed switching transistor avoid this problem.
Construction
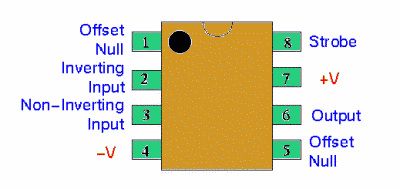
No special PCB is required, I built my prototype on a small piece of Veroboard. The pinout for the CA3140 is shown below. Note that only the pins labeled in the schematic are used, pins 1, 5 and 8 are not used and left unconnected.

Alignment
There is nothing to set-up or adjust in this circuit. The only thing to watch is that the emitting diode is pointing at the controlled device (video, CD player, etc). I found that the beam was quite directional. Also make sure that there is a direct line of sight involved. It will not work if a 5 foot spider plant gets in the way, for example. I had a usable range at 5 meters, but possibly more distance may be possible. As a check, place a dc volt meter across the 27 ohm resistor. It should read 0 volts, but around 2 or 3 volts when a remote control is aimed at the photodiode.
Specifications of Prototype
Having made my prototype, I ran a few tests :-
Current consumption 2mA standby 60mA operating ( with 12V supply)
2mA standby 85mA operating (with 15V supply)
IR receiver range < 1 meter
IR transmitter range > 5 meters
It is difficult to measure the IR transmitter range as this is dependent upon a number of factors. The type of infra red control used and its proximity to the receiving photodiode, the voltage supply, the wavelength and efficiency of the IR emitter and the sensitivity of the controlled appliance all affect overall performance.
In Use
The reception range of the IR remote control to the photodiode depends on the strength of the remote control, but I had a working range of a meter or so, this needs bearing in mind when placing the circuit. Its also a good idea to wire LED1, the coloured LED near to the photodiode, that way, you know that the unit has received a signal. The IR emitter has a larger range, I had no problems at 5 meters but may possibly work further distances. The emitting diodes are quite directional, so make sure it is aimed directly at the appliance to be controlled. The IR emitting diode is small and can be placed out of sight. I drilled a small hole above the door frame. The emitter diode leads were insulated and pushed through this hole, leaving an inch or so to adjust the angle and position of the LED. From a distance, the clear plastic lens of the diode could not be seen.
Final Comments and Fault Finding
To date this has proved to be one of the most popular circuits on my site. Of all the email I receive about this circuit, most problems relate to the Infra Red photo diode. You must make sure that this is pointed away from sunlight, or use a type with daylight filter, otherwise LED1 will be constantly lit, and LED0 will be in operation also. This will draw excessive current and in some case overheat the BC337. The main problem is when using a different photo diode to the SFH2030. Any other photo diode LED should work, but you need to know its operating wavelength range beforehand. This will generally be described in the manufacturers data sheet or possibly described if you order from an electronic component catalogue. With these last two points in mind, you should be rewarded with a useful and working circuit.
PCB Template
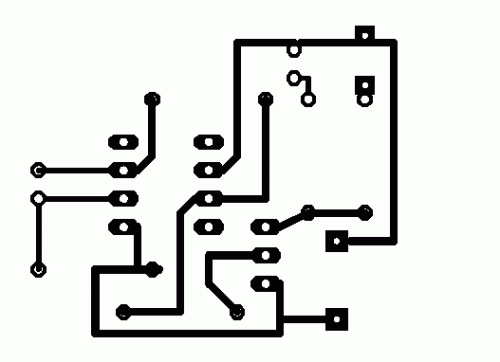
This has been very kindly drafted by Domenico from Italy. First the copper side:

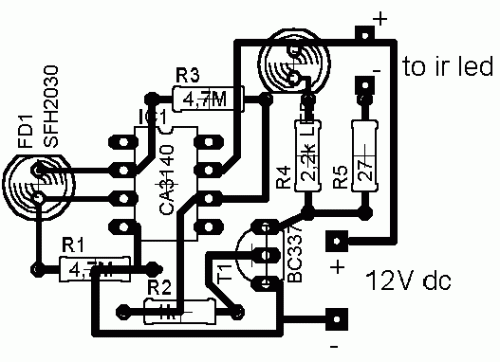
A magnified view from the component side is shown below: 
author: Andy Collinson
e-mail: anc@mitedu.freeserve.co.uk
web site:
http://www.zen22142.zen.co.uk
 Audio (49)
 Power & high voltage (43)
 Radio (23)
 Light & LED (31)
 Tools & measurement (40)
 Telephone (18)
 Automotive (10)
 Microcontrollers (12)
 Sensors & control (47)
 Timers & oscillators (40)
 Miscellaneous (26)


